Originally intended to document my experience of DeLorean ownership, focus is often radical and strange, boring and obtuse.

Friday, May 10, 2013

Shave Your DeLorean Eyebrows!

 photo eyebrownsm_zps33bb5ec1.jpg

Although the DeLorean's stainless facade allows it to withstand the elements for 115 to 117 years, there is one thing that can make the 80's icon look atrocious.

Eyebrows.

In the DeLorean world, "eyebrows" are what we call the warping of the front fascia above the headlights. When the fascia rises over the high beams, it replaces the strong, confident look of the car with a comically worried one.

I don't know if there has ever been 100% consensus on the cause, but it is generally accepted that the sun is the culprit. My car is a good argument for that theory. The original owner had two homes - one in California, the other in Arizona. He spent years driving back and forth in the blazing desert sun between the two, rocking out to A-ha.

Over the years my eyebrows worsened until, in 2010, I had had enough. The solution: steel bars. I bought two, each 1/8 inch thick, approximately 1 inch wide, and 15 inches long. To adhere the bar to the underside of the fascia, I bought a tube of SikaTack-Drive windshield glue from Speedy Autoglass for around $27. It is fully cured in only 2 hours. (The Speedy employee told me to work FAST, as I would only have about 5 seconds of fiddling time if I didn't set the bars right.)

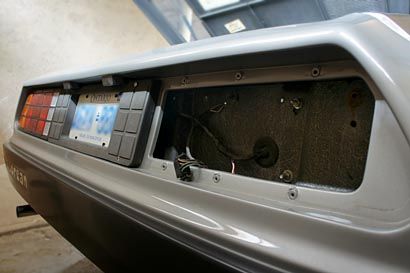
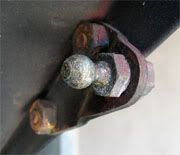
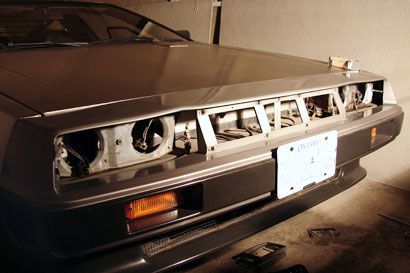
My stick-arms trembled as the front grille resisted my attempts to remove it. When it popped off, I then removed all four headlights followed by the headlight mounts. This gives access to the fascia.

SikaTack-Drive windshield glue is horrible stuff. Scaaaary horrible. Its tar-like properties allow it to adhere to anything, including air molecules. It must be heated up an incredible amount before you can use it. I placed it on my engine and ran the car. During this time I used my heat gun to warm up the top and underside of the fascia until it was pliable.

The wood protects the paint from the clamps.
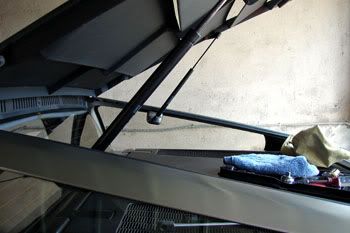
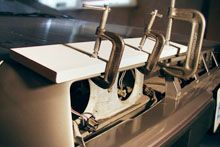
After nearly an hour, I put the tube of warm SikaTack- Drive in my caulking gun. With great difficulty I managed to apply it to one side of the steel bar. I then slid the bar inside the fascia and clamped it down (or "up" rather) using a piece of wood to protect the paint.

I repeated this on the other side and left it clamped for the afternoon.

Six hours later I removed the clamps. Instantly I watched the fascia strain against the steel bars as it tried to pull itself back into its warped state. The steel bars actually bent! At first I threw a temper-tantrum. However, considering how bad my eyebrows were, the result was actually good. My driver's side eyebrow was diminished by about 90% while my passenger side looks about 95%. And for now, it's better than forking out a grand for one of these.

Labels: ,

Sunday, March 31, 2013

Gullwing Grief - Hairdryer to the Rescue

1.21 gigawatts? I'll need one or two more inverters to handle that!

People are undeniably seduced by gullwing doors, whether they're on a lowly DeLorean or the supreme Mercedes SLS.

DeLorean doors, powered by a Grumman-aerospace torsion bar plus a strut, want to rise upward by nature. The only thing holding them down are the latches. And my latches are worn out. In the cold they don't catch and the doors launch upward.

Since I can't drive the car in the cold specifically because of this problem, I decided to have DMC Midwest replace my latches. I made all the arrangements, ordered parts, booked hotels and even plane flights.

But the ONE day I have to drive to Crystal Lake, Illinois is a terribly cold day sandwiched between all the nice the weather. And the main reason I'm going, ironically, is so the Swingles can replace my latches that don't work in the cold! This means that on my nine hour drive I would not be able stop. Not to eat, pee or even get gas.

Now here's the absurd part. In addition to these woes, my driver's window is broken and stuck in the up position. This means I have to open my door every time I pay a toll or talk to the border guards. But once my door is open, my goose is cooked.

Solution: A one thousand eight hundred and seventy-five watt hairdryer. To make this work I bought a super-badass 2000 watt inverter for $199. I attached appropriate cables, clamped it to my battery, and plugged in the purple hairdryer.

As ridiculous as this sounds, it works. Now I'm thinking of bringing my 1000 watt microwave too. After all, what's a road trip without burritos!?

Labels: , , ,

Saturday, February 16, 2013

DeLorean Speedo Cable - Oh Snap!

My snapped DeLorean speedo cable dangling.

When a police officer stops you and rhetorically asks how fast you were going, "No" isn't the best answer. Neither is "less than 88 miles per hour, DUH!"

My speedometer cable broke in the fall, putting me in the stressful situation of constantly scanning bridges, bushes and side streets for sneaky speed traps. Wow, say that 5 times fast! Sneaky speed traps! Sneaky speed traps! Sneaky steed taps! Sneaky sneed maps! Bah! It's more difficult than it looks.

I ordered a new cable from Dave & Julee at DeLorean Motor Company Midwest. It's the lower cable that runs from the bottom of the Lambda counter to the angle drive on the driver's front wheel.

Replacing this cable is another of those very easy jobs that took me considerably longer. I estimate this to be a 10 minute job however, due to my nerve damage it took me about half an hour. I tried to make it easier for myself by jacking up the front of the car to give me more room to access the cable.

DeLorean Lambda
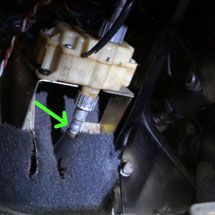
My next step was to undo the cable from the bottom of the Lambda and push it through the firewall. However, when I did this I noticed something unusual. There was a small electrical wire piggybacking it through the rubber gasket/plug. "This is a problem!" I thought, as it would mean I'd have to slice the gasket/plug to slide the wire through, and slice my new gasket/plug as well. I followed the wire past my pedals and behind the radio and discovered it was not attached to anything. Although I thought this was a stroke of luck at the time I have now found myself wondering, "Crap. What doesn't work?"

One thing I noticed during this job is that my old cable housing was considerably stiffer than my new cable housing. The speedo cable is prone to snapping and requires periodic lubrication. But I now think age is a factor too. As the cable housing stiffens up with age, it puts more pressure on the inner cable, which binds.

I slid the new cable through the hole in the firewall and screwed it into the Lambda. The most difficult part for me was forcing the new gasket/plug back into the firewall hole. Once it was done I simply screwed the other end of the cable into the angle drive on the front wheel. Easy! And here it is completed.

The only downside to all of this work is that it's -16 Celsius out and I'll have to wait for spring to test it out.

Labels: , ,

Friday, December 07, 2012

Oh Shit! DeLorean LED Lights

LED lights are lighter and more aerodynamic, making the car 10% faster.

I think every DeLorean owner has had that "Oh Shit" moment. Where you've left your doors open at a car show and realize you forgot to disconnect your battery. Well, if you're running original 12v bulbs in your doors, there's a good chance it's dead. Good thing you've got your DeLorean friends around to give you a boost.

But wait! They left their doors open too. Now you're ALL going to need a jump from some guy in a Bricklin. Oh the humanity!

Fear not. The solution is LED bulbs, which consume the tiniest fraction of what the 12v bulbs do. And yes, I realize I'm probably the last person to do this, so my posting is rather pointless. Again.

I used a flathead screwdriver and a lot of finger-power to pop out my rubber light casings. The plastic lens was easy to remove from the rubber. I installed two red LEDs and four orange ones. With the plastic lenses back on, the colour was better.

Despite this being one of the easiest jobs on a DeLorean, it took me a long, painful time with this due to my nerve damage. About an hour if I recall.

The LED kit is available from the DeLorean Motor Company for $20. And yes, these LEDs have typical LED problems - a very small compromise I'm willing to make. (I've also saved my original bulbs in case I want to change them back one day.)

What are the problems? Aside from minor colour differences, the big issue is that they are directional. Incandescent bulbs glow in almost 360 degrees. These LEDs point outward, and therefore don't illuminate the plastic plate evenly. There's a bright spot in the middle instead of a warm even glow. See my comparison photo here. The LED is the photo on the right.

But this is a small price to pay for peace of mind. You can now leave your doors open at car shows and have nothing to worry about. Oh, except those sticky, snot-covered kids who climb right into your driver's seat and goo everything up. There's a limit to what LED bulbs can do.

Labels: , ,

Thursday, November 22, 2012

DeLorean Bling

DeLorean Bling!SQUEE SQUEE SQUEE SQUEE! I heard the nose coming from the engine, directly behind my head. "That sounds like us" I said, slightly worried. "No, it's NOT us!" declared Sue. SQUEE SQUEE SQUEE SQUEE! "Yeah, that's definitely us." I replied. "No! Don't stop the car!" yelled Sue.

A few seconds later I had no choice. With a tiny snap my rear window fogged up. I immediately pulled off the highway and shut the car off, then watched as coolant spewed onto the ground. I peered into the engine bay only to find my water pump pulley was missing. It had snapped off due to metal fatigue, wedging itself into a nook in the 2.8L PRV.

Dave Swingle, owner of DeLorean Motor Company Midwest called it "A very unusual failure!" And so, my summer fun ended and work began on the DeLorean.

My choices were as follows. Pull the water pump, press a new pulley on, and reinstall my water pump. I didn't see the value in that since the cost savings over option two was about 37 cents. Option two was pull the water pump and replace with an OEM water pump and pulley. And finally, option 3 was pull the water pump and replace with a bolt-on pulley & pump.

For less than $100 more, I liked option 3 the best. The bolt-on pulley was the most logical choice. If my pulley ever failed again I could simply unbolt it myself and bolt on a new one, thus saving me the hefty labour expense (By the book, it's 6.5 hrs).

So who sold a bolt-on pulley? Hervey. And it was anodized aluminum. Sweet.

When my mechanic placed the order, Hervey told him there were only 2 left. And he wasn't planning further production of them. I bought the entire silicone hose kit (lifetime warranty) and my mechanic took the utmost care installing it all, as if he were working on a show-car.

Should this pulley fail, it is an inexpensive DIY job I am absolutely capable of undertaking. Should it not, I have a bitchin bit of bling to dress up my 31 year old engine bay! It's always awesome to make the best of a bad situation.

Labels: ,

Monday, October 01, 2012

My Missing Taillight

Was I in an accident? Nope, just doing some maintenance.

My angle drive broke suddenly on the weekend reminding me that I had done quite a lot of work on my car all summer and forgotten to blog about it. It's been pretty dead at dmc&me all summer so I thought I'd update... just as soon as that tumbleweed blows by.

Okay good.

So, why is my DeLorean tail light missing? Because I had to replace the light in my engine bay of course!

Almost ten years ago, when my mechanic was fabricating me some fuel lines (before I even knew there was a DeLorean Motor Company in Texas, and before our local club existed) he left the engine cover open for a number of hours.

During this time the incandescent work light bulb heated up to over 200 degrees, melted the plastic case and then burned out. If you had to do any engine work in the dark, it's a relatively useless light so there was no urgency in replacing it. But I had the parts, and was hoping to perhaps win an award at one of our local shows this summer, so I got to work fixing small things like this.

In order to replace the light case/fixture ($26 from DMCH), I removed the tail light to gain access to the back of the nut/bolt combo. I slid the wires through the hole in and into the white case, seen here. While I was at it, I used the LED bulb kit ($20 from DMCH) to prevent this from happening again. View the bulb here.

Another benefit of the LED light is that it allows me to leave my engine compartment open during a show without draining the battery. That way nobody will miss out on my sexy coolant hoses.

You can see the melted light next to the new light here. It's a definite visual improvement. The only downside to the LED bulb is that it is a cold, harsh blue rather than the warm yellow glow of a standard incandescent. But if you install one and it really bothers you, there are websites where you can custom order a warmer, more natural LED colour.

Labels: ,

Monday, June 04, 2012

Canada's Royal Visit: DMC Midwest

DeLorean Motor Company Midwest took over Toronto Brake for a day.

Our DeLorean club in Ontario consists of over 60 members, 20 of whom are highly involved. Ten years ago it was not this way. But things have changed, and finally the United States has noticed. On June 2, 2012 the crew from DeLorean Motor Company Midwest paid us a visit. June 2, 2012 was a very special day.

Dave & Julee and their entourage drove ten hours from Illinois to Toronto, then spent an entire day diagnosing and repairing problems with our cars. Helping them get through the workload was the staff of Toronto Brake, who graciously hosted garage duties.

Upon arriving, one of our members, trapped inside his car, required an emergency rescue. DMC Midwest's visit could not have been better timed. Some of the other work was bit more mundane, however. While some cars had their CO mixtures adjusted, others had new window motors installed, a/c units diagnosed and hydraulic clutch lines replaced.

I myself had my door alignment checked, a windshield wiper electrical repair and a stuck open window temporarily fixed (until I can pick up a new motor at DCS 2012 next week).

Later in the day the most exciting repair took place: a torsion bar adjustment! This unique process done with proprietary "home-made" tools drew a crowd of onlookers. In less time than it took to replace a pair of inner door seals, Jason and Mike had the drooping doors functioning perfectly.

This was the largest DeLorean event in Canadian history, with approximately 20 cars showing up, including Ken's Time Machine and a DMC-12 from Quebec. At the end of the day we went for dinner locally, inadvertently holding an impromptu car show in the parking lot. For the next couple of hours we relaxed, told stories, ate, drank, and basically shared each others good company. A perfect day.

Labels: , , ,

Friday, January 13, 2012

DeLorean Door Adjustment

Adjusting the sexy DeLorean doors with a not-so-sexy 17mm wrench.

Arguably the most recognizable feature of the DeLorean is its super glammy gullwing doors. Of the handful of manufacturers who have produced gullwing doors, the DeLorean's (aside from the new Mercedes SLS) are generally accepted as the most reliable.

First, a cryogenically set torsion bar designed & manufactured by Grumman Aerospace "untwists" and begins to lift the door. As its limited power runs out a standard strut takes over and lifts the door the rest of the way in an uninterrupted & sexy manner.

At the factory the early cars, such as mine, had door alignment problems. Sometimes the doors would not close properly, or only one latch would catch as there were no door guides. My car has the early stainless steel quality control guides and I've always had to slam my doors. In the winter the rear latches catching were dependent on temperature. The colder it was, the less chance they'd have of catching. I decided to fix them.

I carried my toolbox into my garage and opened the driver's door to reveal the bolt. The black paint on the bolt and washer were quite worn. It was clear that my door had been adjusted before.

Bobby McFerrin would say, Don't worry, be happy. The plate doesn't fall off.Using a 17mm wrench I loosened the nut around the latch bolt about 3/4's of a turn. This allowed me to move it around within a small area. It is attached to a larger plate on the other side. I wasn't sure if that rear plate would fall off, but the design wouldn't make sense if it did. So I chanced it... and the plate stayed put.

I moved the door pin around then slowly closed my door over and over, carefully watching the latch as it swallowed up the bolt. After about 10 minutes of fiddling, I had the bolt in the perfect position and tightened it up.

Had I known it was this simple, I would've done it years ago.

I shut the door repeatedly, very happy with the results. I no longer have to slam my driver's door, and the door panel is aligned perfectly with the body! Unfortunately, I could not seem to figure out the passenger door, so maybe it's not that simple after all.

Labels: ,

Saturday, November 19, 2011

Insight Battery Cable Conundrum

Insight with extended negative battery cable. The battery is covered in baking soda because it was leaking.

I don't particularly like how Dealerships cater to our generation's NAME-BRAND ONLY attitude. Maybe we as customers have driven them to that. Maybe not. Regardless, it seems to me that Dealerships treat our cars as disposable sources of constant income via replacement - never worthy of being updated or modified. If it's 4 years old, it's outdated like a computer and time for a trade-in.

I've found my usual Honda Dealership to be very closed minded when it comes to car repairs. If it's not an official Honda part or something alters the original design specs, they will refuse to work on it - even if it's their own fault.

My Dealership could only get the 151R Honda FIT battery for my Insight instead of the normal 151. Because the terminals were reversed, the negative battery cable would not reach. But my Dealership refused to extend the cable the measly 3 inches to reach the battery. They said, "we will not modify the original design of the car." Two weeks later they sent me something in the mail asking me to trade in my Insight!

Since my family works at the dealership I was really surprised at this attitude. I did not want a new car. I just wanted the cable lengthened! But every single mechanic/tech refused to add a longer cable. When pressed, they said I might be able to get an independent garage to do the work, but I was looking at 3 hours of labour.

No. That's not a typo.

The Honda Dealership estimated THREE HOURS of labour to unbolt the 6 inch cable, then bolt a 9 inch cable in its place. Are you laughing? You should be. I can't make this stuff up.

Thankfully my regular mechanic is a tad more logical and intelligent. He's the kind of guy who can tell you the most boring story about some random bolt, and make it so exciting that you can't wait to rush home and tell all your friends about this boring random bolt. And it's nice he can take time away from 7 and 8 second drag cars to do an uninspired job like this. He had a new cable fitted and installed in 15 minutes... including driving the car into the bay.

So, I will let you all know if the car burns to the ground because of the extended ground cable. And if you take a shower one morning and find "the dealer was right!" scrawled across your foggy bathroom mirror, you'll know I was in the car when it happened.

Labels: , , ,

Sunday, September 25, 2011

Ceramic Coated DeLorean Exhaust

Bitchin' NOS exhaust from DPI.

"Should we pull over the DeLorean?" an officer asked his coworkers as I passed the group of them, shielding themselves from the rain. And after a harrowing drive through that nasty storm, I arrived home safely - just in time for my cousin's wedding.

Unfortunately for me, the previous owner did not know how to take care of the DeLorean and fibbed extensively about its condition.

Sadly, mechanics with working knowledge of the Bosch K-Jetronic fuel system are either retired or, in most cases, dead. My voodoo skills aren't up to par yet, so raising them wasn't an option. Zombie mechanics are unreliable anyway, with limbs falling off mid-accumulator job, or eyes oozing out of their sockets into the gas tank. Forget it.

And so Josh was the chosen priest to exorcise the DeLorean's demons. The first gremlin to be eliminated was the fuel distributor, followed by a warm up regulator, a full throttle microswitch and 8,172 gaskets, o-rings and washers. The previous owner bypassed the idle speed ECU when it failed, along with the Lambda system, both of which were restored to original condition.

Josh also replaced the clutch, leaking master and slave cylinders, reservoir, and upgraded the plastic clutch line with the braided stainless steel line. Not everything went as planned and Josh didn't finish some of the work. But he's in demand. I'll take what I can get.

Finally, the ass end of the car received a sweet upgrade. Something I've been planning a long time.

Over the years I've driven a number of DeLoreans with various exhausts. I found anything with headers to be far too sexy for me. Plus it has a bad horsepower to volume ratio: I don't think the extra 7 to 10 hp is worth the extra decibels. I prefer the sweet Euro exhaust note and decided on a completely stock system, but with one bonus. I had it ceramic coated in polished silver.

Ceramic coating the exhaust has a number of benefits. It traps the heat in the system, keeping the engine bay cooler. A cooler bay means cooler intake temperatures with higher oxygen content. And hotter air flows faster out of the exhaust, leading to lower backpressure and better scavenging inside the cylinders. The result is a documented 2% to 3% more power. In my case that conservatively translates to about 2 more hp. Not to mention it's effing gorgeous!

------
See what the exhaust looks like from behind.
The driver's side cast iron exhaust manifold with ceramic coating.

Photos open in a new window.

Labels: , , , ,

Friday, September 09, 2011

Joe Cool Fan Relay Failure

Joe Cool. Super rad.

One of the DeLorean's weaknesses is the Lucas relays, which can fail at any time. This will likely happen at the worst possible moment. Like when you're being chased by, say, the Libyans or something, in a mall parking lot.

Ask around the DeLorean community and most will tell you that only Concours cars use the original relays. Most will tell you you're crazy if you drive around on the original relays.

Well, call me crazy.

My DeLorean has 112,000 miles clocked, which is sorta medium-high in the DeLorean world. And I'm still going strong on the original Lucas relays. ODOC prez Kenny and Pat Mastroianni (yes, that Pat Mastroianni) have both been on my back to replace the relays. So it's kind of ironic that the ONLY relay to ever fail on me was the ONLY one I'd ever updated: the cooling fan relay.

The only melting I want in the DeLorean is cheese. On something from Taco BellThere are a few fixes for the cooling fan relay. The most basic is a pair of wires used as a jumper. But it can melt and should only be used as an emergency fix. The DeLorean Motor Company and John Hervey (DAP) sell updated relays. Rob Grady's Fanzilla is no longer available.

The option I installed in 2009 was Joe Cool, made in limited numbers, and no longer available. It was available through the DeLorean Motor Company Midwest and McFly Motorsports for a while, for $175.

See it installed here.

Normally both fans kick on together, sucking huge amperage. While this is only for a second, the spike causes damage as the current runs through the circuit board. It melts the soldering, causing the relay to fail. You do not want your fans in cahoots with each other! What Joe Cool does is stagger them slightly, so one comes on before the other. This stops them from drawing too much current at once.

Unfortunately for me, my original failing fans draw such HUGE current that my Joe Cool failed while driving the car on a lengthy journey to DPI with friend Ken. Sitting in a traffic jam I watched in horror as my temperature gauge creeped past 220 and edged towards 260.

Joe Cool did not keep his cool. Joe Cool had let me down!

I warned Ken I was about to overheat and spill coolant all over the road. We unscrewed Joe Cool and discovered one of the two fuses had blown. Driving at high speeds to keep the air flowing through the rad, we escaped the jam and high-tailed it to the nearest Pep Boys where I purchased new 15 amp 3AG type fuses for less than 5 bucks. With a new fuse in place, Joe Cool was back to normal and the fans came on beautifully.

Let this be a lesson. Even the updates cannot be relied upon 100% of the time and a sane DeLorean owner will carry around a spare set of relays. Then there's me.

---------- Update June 2012: After DMCMW's visit I've learned why Joe Cool failed, and my fans are the culprit. My fans are beginning to fail, and as such are drawing too much amperage for the 15 watt fuses. Joe Cool is fine - I will have to replace my fans soon.

Labels: , ,

Monday, August 31, 2009

Valley of Death

DeLorean Valley of Death, dirty, but no holes!

What do bloody mice carcasses, mice skeletons, engine coolant, slime, and general nastiness all have in common? No, they are not McDonald's primary ingredients. No, not even in Vietnam. Give up?

They are all things found in the DeLorean's Valley of Death, also known as the VOD.

Now I see you are asking yourself, where is this Valley of Death, exactly? Basically, it's the space between the top of the engine block and the intake manifold. And iff'n you ain't careful, this valley, or dip, between the two banks of cylinders turns into a cesspool. And then the death part comes.

So, what's so deadly about this valley? Glad you asked. This is the place where time uses science against you to destroy your precious PRV V-6, bringing death to your cruise nights. And your wallet.

Coolant keeps your engine cool, but over time it turns acidic. A major coolant line runs right through this valley. If coolant leaks here, it sits in the channel undetected for years baking acid pies and cakes. When did Playcar magazine start showing the internals? Dirty!These delicious treats slowly corrode the aluminum and melt a hole right into your engine. Here, the cake & pie will raise a family of grenades, which will then detonate when they hit puberty.

When I took my intake manifold off I was shocked at what I saw. It was neither a mouse carcass nor a pile of sludgey coolant with a severed finger floating in it. In fact, it was nothing at all. Have a look at that bit of dirt the green arrow points to. That's it.

With Over 110,000 miles on my DeLorean, which is on the high side as far as most DMC-12's go, it should have been a Godzilla-vs.-Tokyo-style disaster. Instead, the valley contained only a small layer of dirt which I vacuumed up in 3.7 seconds. My VOD turned out to be the Valley of Cleanliness, and did not require any attention.

And that's a very good thing, because if I order one more part for the DeLorean, my wife assures me there will most certainly be a death in our garage. (And I don't mean the engine.)

Labels: , ,

Saturday, August 15, 2009

I Cheated On John DeLorean

DeLorean muffler bracket, carved out of frozen Canadian armpit hair.

It was bulging, and pressing up against a fireproof barrier. It was one of the first things I noticed when I bought my DeLorean: the patched muffler was actually touching the heat shield, and I vowed to replace it with something cool, more free-flowing, and in keeping with the car: Something stainless, like this.

But the more years that went by and the more I thought about it, the more I didn't like the idea. I had to decide if I wanted to keep everything stock, or get a bit more power, and a bit more fun, out of the car.

Aw poop! A broken muffler bracket!Then it happened. Last July one of the muffler brackets must have froze in the intense cold of our Canadian summer, and broke. The muffler bracket is weak and typically breaks in the same spot. The DeLorean Motor Company in Houston, Texas, has an upgraded part to replace this bracket. All that is required is to take the rubber damper out of the original, and screw it into the new unit.

When I was visiting McFly Motorsports in Ohio, I mentioned my broken bracket to Josh - and he handed me a new one. It was straight as an arrow, and looked much more functional that the mangled unit I had lying around at home, using my internets, eating my food, and drinking my juice. It was time to give the old bracket a kick in the ass.

A crippled muffler bracket which no longer functions.But I couldn't bring myself to use the new, improved bracket. I felt like I was cheating on John DeLorean. First the replacement exhaust... and now this? I was already feeling guilty for using a stainless steel coolant bottle instead of the original plastic one that, over time, becomes so brittle it explodes, leaving you stranded.

Stranded in the middle of the desert. In August. With nothing to drink but a huge puddle of delicious coolant.

I decided to keep the original 1981 bracket. I took the two pieces to a shop called Zoro Muffler. I asked the owner if he could help me, handing him the two pieces. He told me that if it could be welded back together, we'd know in a few minutes.

It was a success - and I paid the owner with two maple leaves and a donut, as that is the currency we use in Canada. I was happy to be able to use the original bracket. When my dad and I installed the new alternator, we first stabilized the muffler with the newly welded bracket. Click here for a close up of the weld, and *here* to see the entire bracket, in all its 28-year-old glory.

I think Sir Mix-a-Lot said it best when he sang "...because silicone parts are made for toys". In many cases, it's best to stick with original parts.

Labels: ,

Saturday, August 01, 2009

DeLorean Intake Manifold

DeLorean intake manifold. Fast and fluffy, ready to go. Only $600. Call...

"With his wildest thoughts, did John DeLorean ever imagine this?" I thought to myself as I relaxed in the 40C temperature of our cedar sunroom, feet resting on my DeLorean's intake manifold, which was doing Ottoman duty.

Only a day earlier I was hard at work with a friend, president of one of the many DeLorean owner's clubs. Together we unbolted, unplugged and tested various things. Finally, with the problem within our grasp, we decided to pull the 16-lb. aluminum manifold.

Once removed, we gained access to two very important parts of the engine: the ignition distributor and the "valley of death" or VOD. (A post on that to follow). Realizing we could not possibly finish the repairs without some new parts, we packed it in.

DeLorean intake manifold. All shots. Comes with 6-month supply of food. Only $600. Call...I have ordered a set of o-rings and gaskets from the DeLorean Motor Company and am awaiting their arrival. In the meantime, I thought it would be a great idea to shine up the manifold.

I went into the backyard with a deadly can of GUNK Engine Brite, made from the tears and nightmares of environmentalists. As I sprayed the heavy duty engine degreaser and scrubbed with a toothbrush, the blackened manifold slowly turned a bright silver.

All around me the grass withered and died, and as I hosed off the patio a celebratory rainbow appeared in the petroleum-based run-off. I let the manifold sit outside to dry off for a few hours, then brought it inside for protection, as a new one would run me nearly $600 U.S. plus shipping if it somehow "went missing". That's nearly $37 per pound.

Well, I guess it's not that bad. With Gold around $900 per pound, I'm glad I don't have one of the ultra-rare solid gold DeLoreans*.

-----------------------
*Just kidding. I totally wish I had one. Oh, and the gold DeLoreans only had gold plated body panels, not engine parts.

Labels: ,

Sunday, July 26, 2009

DeLorean Alternator Replacement

A shiny new 140 amp alternator does a DeLorean good.

In 1981, Johnny Carson was left stranded on the road because his DeLorean was outfitted with the original Ducellier alternator. This alternator was not able to supply the car with enough amps to run everything, and so the battery slowly discharged. My DeLorean was also equipped with this same alternator.

When the problem was discovered, the DeLorean Motor Company replaced the 60 amp Ducellier with an 80 amp Motorola alternator. But even this Motorola unit was stretched to its limit when everything was turned on.

Over the years many a DeLorean owner has had trouble. Trouble due to the underpowered alternator, NOT because the cars were filled with bags of cocaine. I was one of those people, so I decided to replace my alternator.

The alternator I purchased was from DMC Houston, or DMCH. It's a super-neat upgraded replacement alternator for $189 USD. They call it the 140 amp alternator. The unit I ordered is rated at 90 amps at idle, 156 amps at 6,000 rpm, and I wouldn't be surprised if it hit 1.21 gigawatts @ 88 mph.

Wires are fully of the electricity. Watch out!When replacing the alternator, always start by disconnecting the battery or you may burn your socket wrench. Or die. In a DeLorean, the battery is located in a compartment behind the passenger seat. The alternator is easy to access, on the passenger side. First, I slid beneath the car with my tools and undid the bolt holding the six brown wires. They wanted to twist with the nut, preventing the nut from being undone. To stop them from moving, I grabbed them tightly with a pair of orange pliers. You do not have to use orange. You can use any colour, really. If you're cool like me though, you'll use orange ones.

Taking cars apart does not require a professional.Next, I undid the bolt holding the adjustable tensioning arm. This allows the alternator to swing on the big bolt holding it to the engine block. For those who are curious, or don't really care about the alternator stuff: when working on the car I was laying on a red blanket on the ground. It was soft. Also, the blue arrow on the right is pointing to the bolt on the arm which I've just removed from the bracket on the alternator housing (the left blue arrow).

Putting cars back together often does.Any kind of automotive work is easier when you have a helper. I borrowed my dad. Up top, I held a 9/16 wrench (snot-green arrow) on the final big bolt while my blurry dad used a ratchet from below. In no time at all the big bolt came undone. I tapped the bolt through the housing and the 10-lb. alternator fell into my dad's hands. Those who know DeLoreans may have noticed the muffler bracket is missing in this pic. It actually broke in half last year and I replaced it at the same time (here is the post on that).

The last step is to undo the little nut that holds the red wire to the alternator. The new DMCH alternator comes out of the box with the red wire plugged in. I shaved off some of the old wire's sheathing, slid the newly exposed wire into the attached crimper thing, and pinched it closed.

Reversing all the steps here, we successfully installed the new alternator. I used a pry bar between the engine block and the alternator to keep tension on the belt while tightening the bolt on the tensioning arm. The entire job took less than 1 hour and 56 minutes, which is the exact running time for Back To The Future.

Labels: ,

Wednesday, April 22, 2009

ODOC Tech Day 2009

Yes, the DeLorean can fly. It just need a little help.

Like a Star-Trek deprived teenaged nerd whose model cement had run out mid-Countach, I lamented the perfectly running DeLoreans that surrounded me as I stumbled into the parking lot, my rumbling exhaust causing commotion.

ODOC's "tech day" 2009 had arrived and ten DeLorean DMC-12's, including yours truly, showed up for the Oakville event. Sydney Automotive had graciously donated the use of their hoist for the day. As long as you had the time and the parts, anything went.

President Ken greeted me immediately. Although we'd spoken via email a number of times, it was the first time we'd met face to face. I instantly felt welcome among the eclectic group of DeLorean enthusiasts whose ages ranged from about 20 to 80 and whose tattoos ranged from about zero to 80.

.With the formalities out of the way, Ken got to work examining everyone's fuel/air ratio with his dwell meter. Based on how badly my DeLorean was running, it was a safe bet my ratio was more messed up than Amy Winehouse. But we were all in for a surprise, as Ken declared mine to be "the only one with proper readings."

Suz and I wandered around meeting the other owners while repairs went on both in the parking lot, and on the hoist. On the agenda were coolant bottle replacements, oil changes, angle drive replacements, ball joint inspection and angle drive lubrication. But one crucial inspection was desired by all - the achilles heel of the DeLorean, the trailing arm bolt.

Up on the hoist I eliminated a ticking timebomb, almost literally. The angle drive is the cable system that controls the speedometer. Once it starts ticking, it is about to snap. I lubricated the cable with silicone lube and bought myself some extra time... Just enough to save some school children trapped in bus. Or something.

Before my car came off the hoist, the group gathered 'round to have a look at the dreaded trailing arm bolt.

Two bolts (one left, one right) are quite literally the only things holding the rear suspension onto the car. Unfortunately, the wrong grade of steel was used, and over time, the bolts bend, distort and eventually snap. The result is devastating and causes uncontrollable weeping. Click here to see the results of the bolt failure!

Mine were in perfect condition and required no attention. It looked as though it was updated with this kit. But another DeLorean was not so lucky. The severely bent bolts changed the mood in the garage. "Don't hit any potholes" was heard more than once. Indeed, a cautious drive home was recommended.

But when you're driving a car that sits 4 inches lower than a Corvette and just out of view of anyone in anything bigger than a Ford Escort, being cautious on the highway is always prudent.

Labels: , ,

Friday, July 18, 2008

Air Is Neat

Plastic. It does an air intake system good.

The DeLorean is cool - and in more ways than one. Forget the stainless steel body, which makes the car better-suited for flux dispersal. Forget the alternate-1985-Biff-head-cracking gullwing doors. The DeLorean, essentially, has a cold air intake.

Cold air intakes are designed to pull cool, outside air into a vehicle's engine instead of using the hot air surrounding the engine. Why is that good? Science! Cool air is more dense, and therefore contains more oxygen, which results in more power when ignited.

The DeLorean pulls its air from the passenger side quarter panel at the rear of the car. The cool outside air then passes through an intake hose, through the filter, and into the engine where it mixes with fuel and explodes.

Explosions - it's no wonder guys like cars.

Ignore Red Green when it comes to cars. Duct tape doesn't work.But I've been having trouble making explosions in my DeLorean this year. For six weeks I was unable to start the D, and I couldn't figure out why. Turns out it was this piece of crap's fault. The intake hose, which had been taken off and put back on more times than Oprah's chub, was split and dented so badly, air couldn't pass through it.

I logically worked through the process discovering that a) I was getting spark and b) I was getting fuel. So what was left? C! I mean, air. With a new air intake hose in place, life-giving oxygen rushed into the combustion chambers and exploded harmoniously. The D started instantly.

All of this leads me to conclude that I like air. Two Martini-thumbs up for air, and two Martini-thumbs down to pieces of crap.

Labels: , ,

Thursday, March 06, 2008

Emergency Caulk Stops Blow

Cracks and gaps in your house let bad things in, like wind. And pedophiles.People with dirty minds, be forewarned: this blog contains dirty words which are being used in ways you do not prefer.

It is a known fact that Canada is cold. Canadians would never consider putting a window in their igloo. And even if they were just crazy enough to try it, they'd be very mindful that it was installed in such a way as to prevent the cold air from creeping in and making man parts shrivel.

When we bought
our 1939 house, we were pleased to see that 3 of the main windows had been updated with new vinyl windows in 1996 when the original builders and owners of the house moved into a retirement home. At that time, the windows were young at only 9 years old. But windows just don't have the same lifespan as humans.

The other
night we had a decent storm. When I walked upstairs I noticed the curtains in one bedroom getting a good blow. I immediately ran to the window to close it, wondering how the bloody heck it became opened. That is when I discovered the window was firmly shut.

Excitement, during caulkification.Puzzled, I stared at the window until I realized it was the gap between the window and the trim which was letting the cold air blast right into the house. It seems that whoever installed the windows was good at sucking, because the job blew.

I always
keep supplies on hand, kind of like a store. Suz thinks I'm crazy for keeping things at the ready, but I prefer to live by the Boyscouts (and Batman's) motto: "be prepared". That is why, in the basement, I had a loaded caulking gun ready to go.

They say running with scissors is dangerous. But, somehow, running with a caulking gun isn't. So I ran upstairs to the bedroom to seal the hole quickly before our house filled with poisonous, frosty air. With the tip of the gun in place I squeezed hard and white caulk filled the gaps as the storm howled and ice pellets smacked against the glass.

Satisfaction, after a good caulk job.When I had finished, the caulk looked bad. Not bad like Michael Jackson, but bad as in, terrible. I filled a glass with water, dipped my finger in it and smoothed out the caulk before it could dry. It took a few attempts to get it smooth and perfect but after a few minutes I was satisfied.

Unfortunately, the window still allowed cold wind to blow through the broken part of the frame where the lock used to be. The blowage wasn't nearly as bad as it was around the frame, however, it still upset me. Had I known earlier how badly these windows leaked, I would have had them replaced along with the 14 others we had done last month.

Labels: ,

Thursday, September 14, 2006

Thank You General Motors

Struts offer super-sweet lift action.

Every 100 years the forces of good mysteriously weaken while Dracula's powers grow stronger. Similarly, every 5 years or so, the gas-charged struts on most DeLoreans weaken while gravity's power, uh, remains the same, resulting in unwanted droopiness.

The louvres over my engine wouldn't stay up any longer, after the gas struts gave up the ghost this summer. At the DeLorean 25th Anniversary show in Chicago, I purchased a new set from DeLorean Motor Center. It was a super deal, and I avoided shipping charges by bringing them over the border myself.

At home I started the strut-swapping process. I braced the louvres with some stuff I had lying around the garage.

Removing the louvre strut.I slid a flat-head screwdriver under the metal retaining clip and pried it outwards. I gave the old strut a yank and it popped off with a little effort. The louvres dropped on the one side so I speedily propped up them up with my head. This was important business as my louvres, amazingly, aren't cracked. Having un-cracked louvres is practically impossible, except on the Concours-calibre DeLoreans which are meticulously cared for and guarded with ferocity.

According to Don Steger, owner of DeLorean Motor Center in California, every DeLorean's louvres have cracked at some point, which is why a louvre brace was developed. When I told Don that mine were not cracked, he simply didn't believe me. But I'll gladly take looks of disbelief from DeLorean experts over having cracked louvres.

One ball, two nutsUsing the flat-head screwdriver I popped the second strut socket off as well. Once the socket popped off, the ball was exposed. My balls were really dry, so it was a good thing the new struts came fully lubed. The new struts snapped easily on and looked really great as they were a little thicker, beefier and juicier than the old ones.

Everything looked good, but it was completely naive of me to expect perfection. I was completely shocked when I tried to open the engine cover only to have it bang into the louvres. The new Stabilus struts were too short! I couldn't lift the engine cover high enough to lock it into place.

My old struts, at 18 inches from centre to centre, were almost exactly one inch longer than the new struts. I phoned Don at D.M.C. and told him of my woes. He agreed to refund my money and I ordered a new set from P.J. Grady in New York. I nearly had an aneurism when I discovered that they, too, were 1 inch too short.

Since both Don and Rob deal exclusively with DeLoreans as their livelihood, I came to the brilliant conclusion that my DeLorean must have been modified. The original owner, upon the demise of the DeLorean Motor Company, must have feared parts would become unavailable. Logically, he had custom strut mounts created using struts from a more modern vehicle - one that would likely be in production for years.

Canadian Tire blew my mind when they found a replacement for my old struts. A hearty Martini-thank you to the 1989-1994 GMC Jimmy & Chevy Blazer.

Labels: ,


This many people accidentally stumbled upon my site
...while searching for porn.