Bender Costume Construction
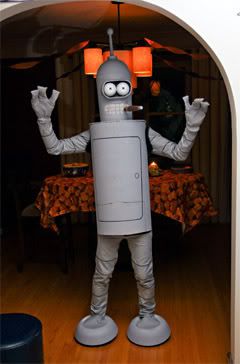 April 2012 update.
I feel great thanks to the kudos from fellow bloggers as well as from other costumed Halloween lovers at the Boston Pizza Costume Contest I won October 31. Therefore, I thought a post on how I made my Bender costume was in order.
My homemade Bender costume started off as a hope. I knew it would be difficult even if I could find the parts I needed. But more importantly, I knew it was going to be impossible if I couldn't find the proper head. That's why I started in August.
Strolling through a Zellers one afternoon Suz stumbled across a $7 plastic garbage can, quite by luck. I popped the top off and slid it over my head. It was perfect.
I began working on the body first. I bought a Quick-tube, or sono-tube, for pouring concrete footings from Home Depot for $9. I bought the largest one they had, 12" diameter. As most people would agree, 12" is too small, so I split it open. It was also too tall for my torso, so I cut it almost in half. It was also too yellow, but that was easy to fix.
Using an angled strip from the bottom half, I wedged it into the backside, where my shiny metal ass would be, and screwed it together from the inside. I used other small curved bits of leftover tube as the joiners. The cracks were filled with Polyfilla and I later sanded them smooth. See Bender's body here.
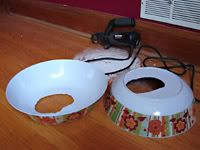 While the glorious amounts of Polyfilla dried, I worked on the footcups. They were easy. I bought a pair of plastic salad bowls from the dollar store, flipped them upside down and, using a Dremel, cut feet holes out of them. I took an old pair of Nike's and glued the toe to the front of Bender's footcup. The glue (Goop) was flexible and allowed me to move the shoe around a bit. Finally, I painted them with grey primer, and attached a flap of grey fabric to cover my black shoes.
 Back on the body, I carefully measured where my arms should go, and using a jigsaw, cut out arm holes in the sides. The tube would sit on my shoulders, so I attached a couple of spongey rubber pads that were a family heirloom, passed down from my grandpa to my dad, and finally to me. True story.
Once I climbed inside it I realized I could neither sit nor walk up stairs. With the jigsaw, I cut a flap in the front, but left it attached in the middle. Using carpenter's glue I attached a tab on either side of the flap and glued a pair of attracting neo magnets to each one plus the flap. The flap could be popped open with my thigh and would slam back down and be held in place by the expensive magnets.
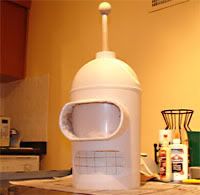 Bender's head is unique and instantly recognizable. I knew I had to get it right so I was very careful and spent the most time here. First, I made the visor where the eyes would go. I made it from cardboard and added popsicle sticks for strength and a smoothness that bent cardboard is not known for. I filled in the little gaps with Polyfilla and sanded till it was perfect.
I know Bender is 30% iron, but in my case, he was 30% filler & adhesives. Using more Goop glue, I sealed the garbage flap in the top of the dome. Then I filled in the gap with, yep, you got it, more Polyfilla.
Using white caulking, I sealed the finished visor to the garbage can and smoothed it with my supreme caulking skills. I cut the top of a spray-paint can in half - horizontally - and glued it to the top of the garbage can to form the base of Bender's antenna. On that I attached a tapered tube of rolled paper. Finally, I mounted a wooden doll's head, which I purchased at Michael's for about $1.69.
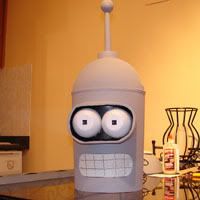 The Dremel was too crazy and unpredictable to cut the mouth out, so I carefully drilled about 40 pilot holes around the mouth perimeter, then cut through them all with a nice blade. Once I sanded the edges smooth the head was ready for paint. Again, I used grey primer, as it matches Bender's colour perfectly.
The dollar store provided Bender's eyes. I used the domes off the packaging of two micro remote control cars, carved them to fit the contour of the garbage can, and spray painted them white. I painted the inside of the visor black, then glued the eyes in place. Once dry, I used a black Sharpie to draw his square pupils.
The fabric for Bender's arms & legs was cheap. I found 1.7 metres of the most perfect grey material at Fabricland for about $7. I had a friend of Suz's family sew this fabric onto some cheap clothing I picked up at Value Village for about $10. She also sewed the most excellent 3-finger square gloves from the same material. Here I am trying it on.
The mouth area is where I see out. I used a hot glue gun and attached some sheer fabric that used to hang in our bedroom window. Suz hated it, so it came down, and this seemed like a great use for it. I drew Bender's teeth with a black Sharpie. Inside the helmet I glued two strips I cut from popsicle sticks. The first reason was to add strength incase the mouth was poked from the other side, and secondly, to hold a neo magnet in place.
This magnet was the key to awesomeness. I glued the magnet's mate to the end of a big plastic novelty cigar that I picked up at Party Packager's for 49 cents. With the magnets, I could put the cigar "in" my mouth whenever I wanted. It worked flawlessly, and the Boston Pizza patrons agreed with their cheering.
This was the most elaborate costume, by far, I've ever attempted. Total cost was close to $100 which included a few extra parts I ruined and had to buy again. Total labour was about 25 fun and stressful hours. Everyone but my dad thought I was crazy. But it all paid off in the end when I won enough money to cover the cost of making it, plus more.
So, if you ever want to attempt a Bender costume, I hope this helps. If not, well, you know what you can bite.

31 Comments:
Wow man I am impressed. *Applause*
2:17:00 AM
*Standing O* looks so good.
I can only imagine what it would look like if I tried to make it. Not only that but it would fall apart and i would find myself and bits of my costume glued to whosever floor i happened to be on.
So once again... sooo nicely done. keep that costume and do the competition circut young man!
10:59:00 AM
SJ - thanks very much.
Kev, really? But, what of all your previous years of robot-costume-building experience? Maybe you'd surprise yourself. Got any old photos from Halloweens when you were a kid?
11:20:00 AM
Bravo! BRAVOOOO!!!! I loved the photography too! :D)!
2:00:00 AM
Wow! You did a great job. This is the costume I tried to get my husband to make this year. If only he wasn't so lazy - maybe next halloween.
3:35:00 PM
That's an awesome costume. I wish I could think of some Bender comment to say right now.
Ohh... I got one... okay... everyone who doesn't have such a cool costume can kiss your shiny, metal ass!
10:00:00 AM
Yes, i think you deserve a standing ovation for this! it's so dang cute! my husband says it's great, too!
11:15:00 AM
Wow! You put so much work into it!!! You are so dang smart...unbelievable how terrific it turned out all homemade..but actually very believable cuz you are a genius!
8:05:00 PM
Whoa, *blush* thanks for the compliments! I just hope these photos and ideas can help someone else in the future.
10:37:00 PM
Back to the Future?
Martini...do your cousins sthat live in Yemen live in Sana-a? (my uncle is asking)
What do they do there?
10:44:00 PM
I asked Suz, and she didn't know. However she told me they now live in the Bahamas. I didn't know they moved!
10:20:00 AM
Oh...ok...no worries!
1:26:00 PM
That is seriously the best costume I've seen in many a live long day! Costume kudos all around for your winning effort!!
Now, start thinking about how to top it next year :)
11:47:00 AM
You had one hell of a costume this year!
Nice work!
11:49:00 AM
Wow, that's quite an elaborate costume -- I thought I was being good by buying mine like three weeks in advance :) Congrats on winning the costume contest -- that's pretty cool you beat the Joker. We thought we'd see a ton of them here, but wound up not seeing any.
Thanks for stopping by my blog and for commenting.
3:43:00 PM
I must say I am totally and completely impressed by your ingenuity! It is truly one of the best efforts I have ever seen!
6:11:00 PM
Looks great, although it might be difficult to pour in the booze.
11:25:00 AM
Wow! That is a freaking amazing costume!
9:56:00 PM
this was an awesome costume to undertake. thanks for helpin me out man. heres my take on it http://photos-c.ak.fbcdn.net/hphotos-ak-snc3/hs055.snc3/14259_319246895006_663280006_9310339_890454_n.jpg
1:52:00 AM
Do you still have this costume? Would you consider renting/lending/selling it to a huge Futurama fan for a Halloween party this year?
I looked for contact information on your blog but can't figure out how to email you.
3:56:00 PM
I appreciate the offer! I'm just not ready to part with the costume, and I have too much time invested in it to risk it being damaged. Plus, I still wear it :) If I change my mind, I (sort of) know where to find you though. You should consider trying to make one yourself. Plenty of time before 'Ween!
7:49:00 AM
i agree. dont try to buy one. make it yourself i made mine (check my link 3 posts above this) its gonna turn heads and get a lot of compliments, hell ur guaranteed to win a costume party if you enter
4:11:00 AM
Hello
impressive work!
I am working on one right now!
I have a question to the torso:
http://i22.photobucket.com/albums/b336/dmcme/2008/benderbodyglue.jpg
Is this the only strip you inserted?
How wide are you, so this is enough for you starting from 12" and only expanding by one strip?
And the strip is angled, but what about the sides where you put it in, are they angled to or did you cut them parallel ?
Thank you for putting this on your blog!
3:16:00 AM
I should update this someday with more detailed photos!
Yes, I only inserted one "strip" down the back. It was angled (wide at the top, narrow at the bottom), but I can't remember if I angled the sides of the main body. I believe I left them straight and the tube just flexed.
The diameter at the top was approx 15 or 16" wide, just wide enough that it would sit on my shoulders.
I hope this helps.
1:23:00 PM
I just wanted to say thank you for providing such detailed instructions for this awesome costume! My pre-teen brother had emergency brain surgery late this summer and is still out of school with vision loss. We're taking an elaborate Bender costume on as a project to help pass the time while he recovers! Thanks again!
2:16:00 PM
That is AWESOME!
9:22:00 PM
Thanks! It's just sitting in a closet now, kinda scratched up, waiting for a triumphant return. Maybe Toronto's Fan Expo?
7:44:00 AM
Nice one! I like the outfit of the characters. Wish i could do the same thing too but im not that techie.i like the outfit of “from farmer to warden”.. really interesting.Santa Barbara Green building
11:39:00 PM
I made my own and won first price in a party here in spain! Thanks this was awesome
8:57:00 AM
Congrats Manuel!! It's awesome that Bender is popular all over the world!
10:43:00 AM
Thank you so much for posting this. My son had his heart set on being Bender and I didn't know where the heck to start. I snagged many of your ideas. I'm almost done, and he is happy thus far. Thank you! :-)
11:46:00 AM
Post a Comment
Subscribe to Post Comments [Atom]
<< Home